TUNI Virtual Desktop - Azure Virtual Desktop
- Quick Start Guide
- Data storage and transfer
- A step-by-step guide to using the Azure Virtual Desktop app
- Using Azure Virtual Desktop in a browser step by step
- Frequently asked questions and common problems
Azure Virtual Desktop (AVD) is the most used virtualization platform / technology for TUNI Virtual Desktop. AVD is suitable for remote use of individual Windows applications as well as entire Windows 10 and 11 desktops with desired software. The service is used with the TUNI user account.
The Azure Virtual Desktop (AVD), hosted on Microsoft Azure cloud service, is like a virtual computer classroom with computers and software maintained by IT services, but with the software completely independent of location. A single AVD virtual host computer, such as a server, serves several users simultaneously. AVD is also a good solution when, for example, a group of researchers needs a shared research machine with specific software that is always available in any location except during maintenance breaks.
Quick Start Guide
The Azure Virtual virtualisation platform may be used with both an application and a browser. Using the application is strongly recommended whenever possible.
Using with the application
Microsoft has replaced the Remote Desktop application with the new Windows App in the fall of 2024. When installing a new Azure Virtual Desktop client, search for the application by its new name. The Remote Desktop application will be updated to the new version on TUNI-maintained computers by the end of 2024.
Download and install a version of the Windows App application (published by Microsoft) that is suitable for your device. The application is free for all supported operating systems.

Windows 10/11
- TUNI Windows 11 PCs: You can find the Windows App from Microsoft Store and Company Portal application.
- TUNI Windows 10 PCs: You can find the Windows App from Microsoft Store
- Your personal Windows 10/11 computer: You can find the Windows App (published by Microsoft) installation package from Microsoft Store
- After installing the required Windows App, open the application and select Sign in.
- Sign in using your TUNI email address.
- You see the applications and virtual desktops that are available to your account.
- Connect to a virtual desktop by selecting Connect. Use your TUNI email address and password to log in.
- When you are finished, log out via the desktop icon or Start menu of the virtual desktop using the Sign out option, in order to free the desktop resources for others to use.
MacOS
- TUNI MacOS computers: You can find the Windows App pre-installed on your device.
- Your personal MacOS computers: You can find the Windows App (published by Microsoft) installation package from App Store.
- After installing the required Windows App application, open the app and choose plus-icon in the upper-right corner.
- Select "Add Work or School Account".
- Sign in using your TUNI email address.
- You see the applications and virtual desktops that are available to your account.
- Connect to a virtual desktop by selecting Connect. Use your TUNI email address and password to log in.
- When you are finished, log out via the desktop icon or Start menu of the virtual desktop using the Sign out option, in order to free the desktop resources for others to use.
Android, iOS and Chromebook
- Download the Windows App (published by Microsoft) from an Play Store.
- After installing the required Windows App, open the application and choose Sign in.
- Order the content with your TUNI email address.
- Sign in using your TUNI email address.
- You see the applications and virtual desktops that are available to your account.
- Connect to a virtual desktop by selecting Connect. Use your TUNI email address and password to log in.
- When you are finished, log out via the desktop icon or Start menu of the virtual desktop using the Sign out option, in order to free the desktop resources for others to use.
Linux
No Windows App published by Microsoft for Linux unfortunately. You can use the web browser version, recommended to use a Chromium-based browser (eg Chromium, Edge, Chrome).
Using with a browser
You need an up-to-date browser with HTML5 support. All major browsers such as MS Edge, Chrome, Firefox, Safari or Opera will work.
- Go to www.tuni.fi/avd and sign in with your TUNI email address.
- You see the applications and virtual desktops that are available to your account.
- Connect to a virtual desktop by selecting Connect.
- When you are finished, sign out from the virtual desktop via Start Menu or desktop icon to free up resources for others to use. Just closing the browser window will not end your session on virtual desktop.
Data storage and transfer
OneDrive for Business and P and S network drives are available on desktops for storing and transferring data & files. The use of OneDrive is recommended to ensure the best user experience, unless there are other obstacles to its use. The D: directory on the virtual desktop is only intended for temporary data storage, as the data stored there is regularly removed from the directory.
You can access OneDrive on the virtual desktop either by browsing through onedrive.live.com or by logging in to the OneDrive program pre-installed on the virtual desktop with your own TUNI ID by clicking on the icon at the bottom right of the virtual desktop. By signing in to OneDrive, you can view the contents of your cloud storage directly in the resource manager window on your virtual desktop.
More information on OneDrive for Business (TUNI) storage space.

A step-by-step guide to using the Azure Virtual Desktop app
The text and images of the steps in this guide were created on a Windows 11 computer using the Microsoft Store version. The text or screenshots may differ slightly when used on other terminal devices, but the main steps are the same for all.
- Open the Windows App and choose Sign in.
- Sign in the app with your TUNI email address.
- You will see the resources shared with your user account as icons:
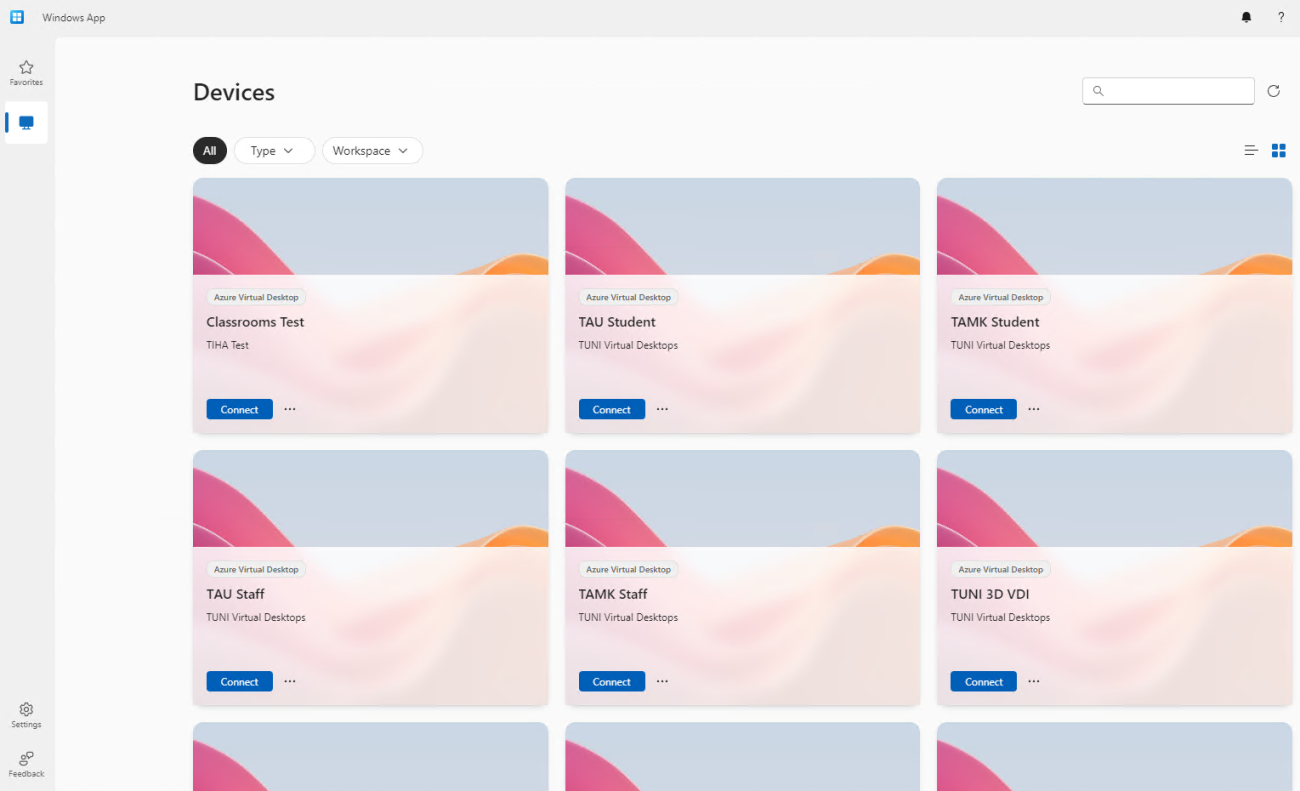
- Select Connect on the desired application or desktop.
- A remote connection to the virtual desktop of the selected item will be established.
- Logon to the virtual resource with your TUNI email address.
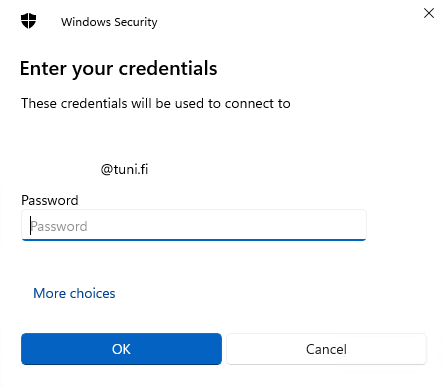
- The selected app / desktop will open in a new application window.
- From this point forward, using the application/desktop is like using a regular Windows computer.
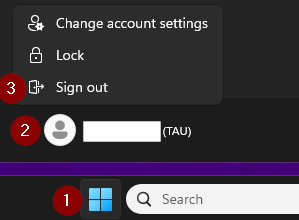
- When you are finished, close the virtualised application or log out from the virtual desktop via the Start menu of the virtual desktop using the Sign out option, or use the shortcut "Sign out" on the desktop.
Using Azure Virtual Desktop in a browser step by step
The text and screenshots of the steps in this guide were created with a Windows 11 computer using the Edge browser. The text or screenshots may differ slightly when used on other devices and browsers, but the main steps are the same for all.
- Open the browser and go to www.tuni.fi/avd
- Sign in using your TUNI email address.
- You will see the resources shared with your user account as icons, similar view as with the application
- Select Connect of the desired application or desktop.
- You may choose which resources from your computer are connected to the remote session. (The choices may vary depending on the item). After selecting, choose Connect.
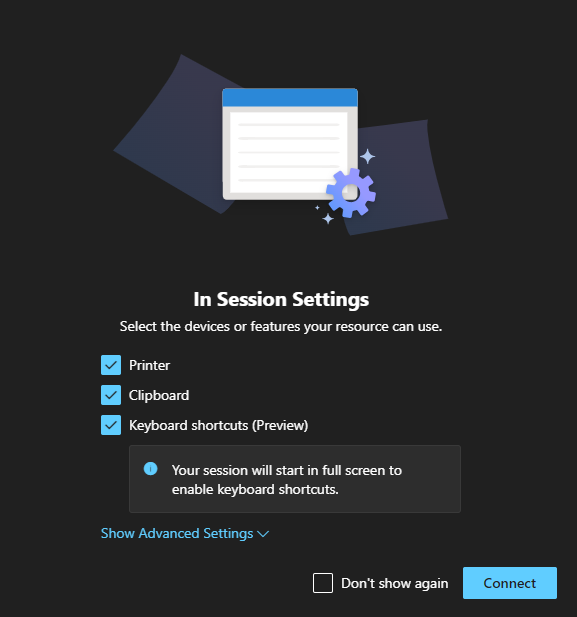
- Log in to the virtual machine with your TUNI email address.
- If you do not enter your login within 30 seconds, a time-out message will appear with a Reconnect option.
- The log in information stored in your browser cannot be used to log in to the virtual desktop!
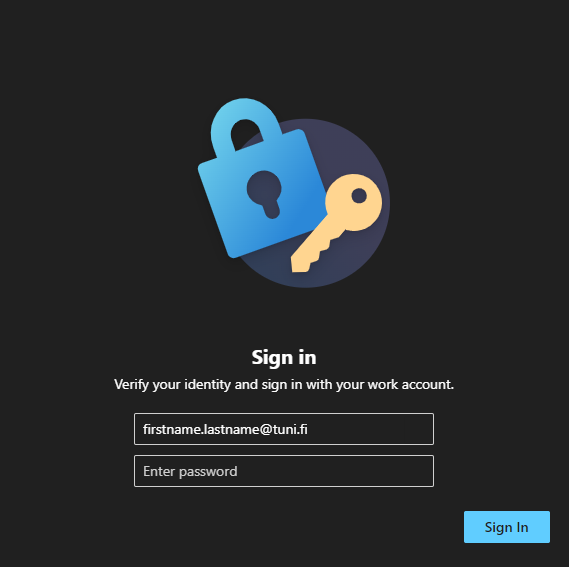
- The application or desktop you have selected will open in a new tab in the browser window.
- When you are finished, close the application, or log out via the Start menu of the virtual desktop by selecting Sign out, or use the desktop shortcut titled "Sign out".

Frequently asked questions and common problems
I cannot see anything in the service / I cannot see a specific application or desktop.
Your account does not have the necessary resource allocated. If it is a restricted student desktop, please contact the course instructor first and ensure that they have ordered the virtual desktop as part of the course implementation. In other cases, please contact the IT Helpdesk.
Adding new resources to your ID may take about an hour.
I cannot connect to the desktop or the application at all, or the connection is interrupted.
Please contact the IT Helpdesk and provide the following information as accurately as possible to speed up resolving the problem:
- When did you detect the problem (date and time)?
- Were you using an application or a browser?
- Which machine and operating system were you using?
- What type of network connection were you using (LAN, WLAN, mobile data)?
- Is your network connection working normally in other respects?
- Provide a screenshot of the error message or a description of its content as verbatim as possible.
A virtualised application / desktop runs slowly
- Avoid processing files with the application directly from the TUNI network disk or from disk drives on your terminal device because this will cause network congestion and result in the slower use of the application. Copy the files to be processed to the application server for use, e.g. in the Documents folder, and open them with the application from this location. At the end, remember to save the files back in your network drive / your terminal device!
- The server may have several users simultaneously meaning that the platform may be temporarily so overloaded that the application slows down. In this case, we recommend you to log out of the virtual desktop via the Start menu of the virtual desktop using the Sign out option, and after a few minutes, log in again to the virtual desktop to redirect your access to the new server.
I cannot log in to the virtual desktop using the credentials saved in the browser’s password manager
Logging in with credentials stored on the virtual desktop is blocked for security reasons. A username and password must be entered at each login.
I use Windows App and I have multiple monitors connected to my computer. How can I connect only one / a specific monitor to a virtual desktop?
- Click the three dots icon ... next to the desktop icon and select Settings.
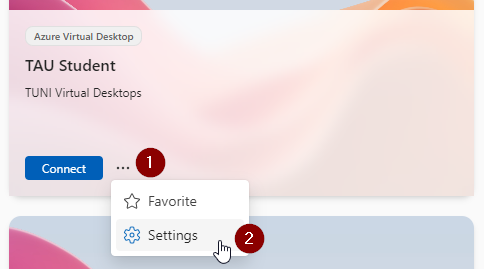
- Disable the Default Settings option to control the display settings of the virtual desktop session.
- By default, all active displays connected to your computer are connected to the virtual desktop (All displays). If you prefer, you can choose to connect only one display (Single display) or select specific displays (Select displays) as part of the remote connection.
IT Helpdesk
+358 294 520 500
it-helpdesk [at] tuni.fi (it-helpdesk[at]tuni[dot]fi)
helpdesk.tuni.fi